“75% of Enterprise Resource Planner (ERP) projects fail due to inexperience with data migration and integration scope. As a result, applications and data connection take longer than expected, costs run over and business value is not delivered”
Hector Parada
Integration Services Manager
Trajectory Group
There’s almost nothing more satisfying than successfully completing a NetSuite data import on the first shot. To do that, you must pay careful attention to each step while designing your data strategy, being sure to define your source systems, create the files & define format before finally importing them into NetSuite.
Time to Read: 10 min
Who should read: NetSuite Administrator, Finance Manager
Drink Pairing: Cinsault wine
Hats off to AndersonFrank for the collaboration on the ERP Admin series
Need immediate support? Contact us in the form below or via the chat box at the bottom right corner.
What you’ll learn:
Data is a key element in business decisions and efficiency, and as a result, one of the most significant challenges in an ERP implementation project. In this post, I’ll walk you through the steps required to easily import your data into NetSuite. Were going to review:
- What’s a data migration project?
- How does data migration affect ERP implementation success?
- Best practices to keep clean data over time
- How to prepare a clean import
- NetSuite data models
What’s a data migration project?
Data migration is the process of selecting, preparing, extracting and transforming data between two or more sources. In the most standard form, a data migration project has 3 different phases: Planning, Migration, and Post-Migration.
Migrating an entire data center to another location is a good example of a large-scale achievement that requires coordination and careful planning. A data migration plan might change depending upon how much data you need to move, where you’re moving it to, and the cost of the move. You’ll need to ensure a secure, efficient and cost-effective method for executing a successful ERP data migration.
How does data migration affect ERP Implementation success?
“If your existing data is inaccurate and unreliable a new software system will not fix that.”
O’Sullivan, Rico, Goldensohn
Data Migration is usually one of the last considerations of an implementation project. It represents one of the biggest challenges because migration can fundamentally change your Go-Live schedule if you make erroneous decisions during the project.
If so, your time estimates will change because of data quality. If the data set doesn’t contain the correct information, this can increase the risk of incorrect data imports and create confusion amongst employees.
Anticipating and preventing these common mistakes will allow your implementation and import processes to run much more smoothly. Having transparency in data management decisions helps avoid misunderstandings, the use of diagrams & mapping tables also helps.
Pro Tip: Keep an eye on things like the record type, and the nature of the record (Am I exporting Employee records or Transactions?). Define the essential fields to be mapped, identify the mandatory information on these records, and always review file formatting, name formats, and date structure.
Leading Practices to keep clean data over time
We have to understand the importance of good data collection. These days, managers use complex data architecture to predict social patterns, customer behaviour, and employee performance. A big part of a company’s decisions is based on these tools.
When we’re implementing a whole new platform, understanding the importance of each piece of data collected is essential. This is the key to keeping your data clean over time.
Bad data is a common thing – it affects the performance of your system and creates inefficiencies (time spent on mundane activities). Identify where the majority of errors occur so that the root cause can be recognized and a plan can be designed to manage it. Data equals knowledge. Good data provides indisputable evidence to make informed decisions.
Here are our top 5 data maintenance best practices:
- Always use unique IDs: in order to identify your records, using a unique ID is the best way to not lose track of your data.
- Ensure your data capture creates inputs: this is important to maintain the quality and performance of your system. Define format standards for phone numbers, addresses, entity names, and ensure that all essential data fields are mandatory.
- Identify duplicates: this is a common issue with databases. Duplicates can create confusion.
- Repair data at the source level: if you need to correct data, always do it from the source. This will be useful to avoid duplicates or massive errors in the future.
- Schedule data cleanups periodically: Doing data cleanups frequently reduces costs and improves performance. If you notice that your system contains bad data, you can always prepare searches to identify it and keep your systems spotless.
Pro Tip: Consider your data in the most holistic way possible. Always think about the impact of what your data is doing. Think about who’s using the data and how they are using it.
NetSuite Data Model Diagram
NetSuite, like all the systems that capture data, has a schema that defines the information that is contained. This is what we call a data model diagram and it can hold names, dates, numbers, currencies, phases, locations, subsidiaries, statuses, conditions, emails, addresses, approvers, etc. It all depends on the record that we’re working on.
NetSuite Data Model Diagram
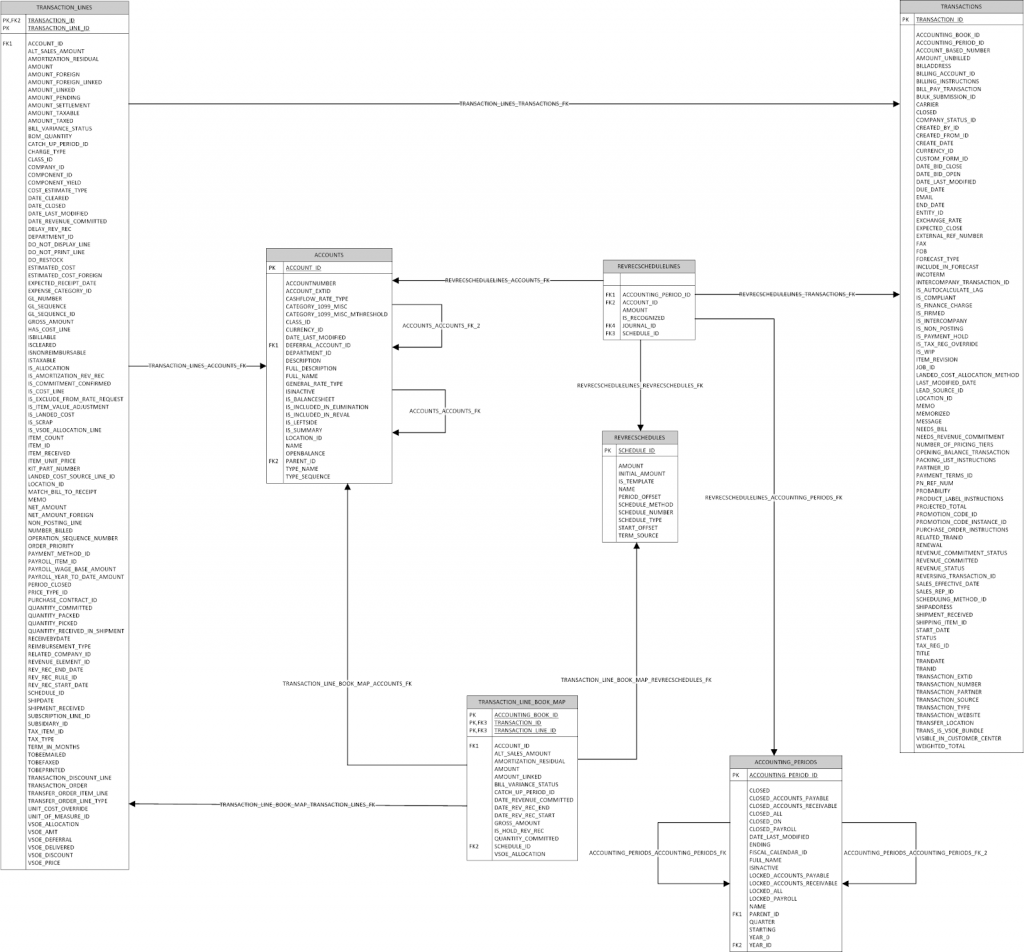
In simple words, NetSuite was designed to capture the information in data tables as Excel does with spreadsheets, but linked with each other. It’s very important to understand the schema on the records that you want to migrate from your source or multi-source systems to NetSuite and create a match between these fields and systems.
Let’s focus on how a data file should look to be imported to NetSuite. Setbacks happen because the file is not done correctly, making this phase extremely relevant to save time on implementations and is a task company should do in order to win the data migration game like a champio.
Here’s are the essential steps to create, save and import data files:
1. Creating CSV files:
Step 1 – NetSuite can only manage one type of data file – CSV. Using the CSV Import Assistant, the data migration process becomes a straightforward action for the various records available in NetSuite.
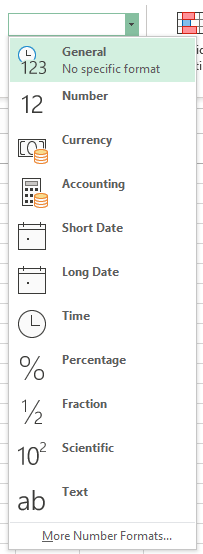
The format of a cell defines how the data is recognized. This applies to numbers, currency, dates, time, etc. To create a CSV file for NetSuite, make sure every cell is in General format before you start to avoid inconveniences.
We’ve worked hard to provide easy-to-use NetSuite CSV Import Templates for some of the key records in NetSuite (vendors, employees, and clients). Our goal is to have easy, time-saving processes for our clients.
Step 2 – Fill the columns with your data. Data must have consistency and be understandable. It’s a common mistake to assume that there aren’t going to be challenges such as data sources not exporting values with accuracy needed. In order to save time and resources here are some basic steps from our data migration best practices post:
- Set up a view of your data – platforms like NetSuite let you view your data in a list view. This works great to keep an eye on your data at any time. Some platforms may allow you to view your data in a list view.
- Check for completeness – see how often some fields are populated. It is possible to have important fields you may not use. There is no need for a field that is not used.
- Do spot checks on the format – Define with your team how the company will submit the information when new records are created. Check things like how your address fields are set, is your phone number always “+1” or sometimes people jump it?
- Identify duplicates – maintain consistency on your data is crucial. While you’re preparing your files, you can identify duplicates using Excel filters and formulas options to validate the correctness of the information and do a clean migration.
- Validate the format required by the new system – always ask your consultants and PMOs how the new target system will be set. It’s very common that the implementation solution has differences with your old system in terms of mandatory fields, format, and structure.
2. Saving CSV files:
Once your files are complete, share them with ERP consulting team to validate the process. Remember, communication between all parties is mandatory for success.

Here’s an example of how the process works within NetSuite
- This is what an uploaded employee record should look like
- To build this file I selected all the columns as “General” format
- Note how the format for emails and phone numbers is consistent. As mentioned before, keeping order creates substantial benefits on reportings and cross-sectional data.
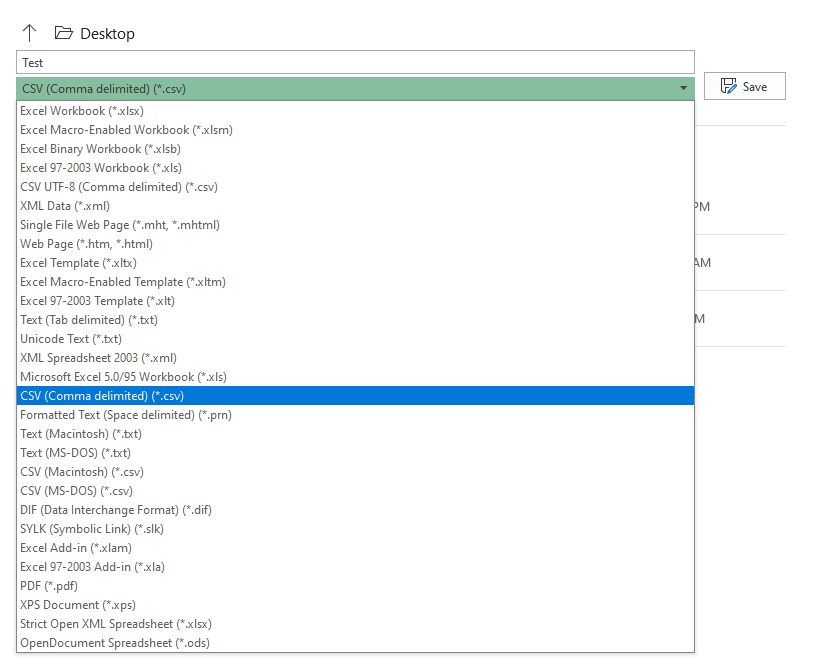
- Once your file is ready, to create CSV files you have to go to the Excel “Save As” options and select the CSV option.
Save As: Excel
3. Importing CSV files:
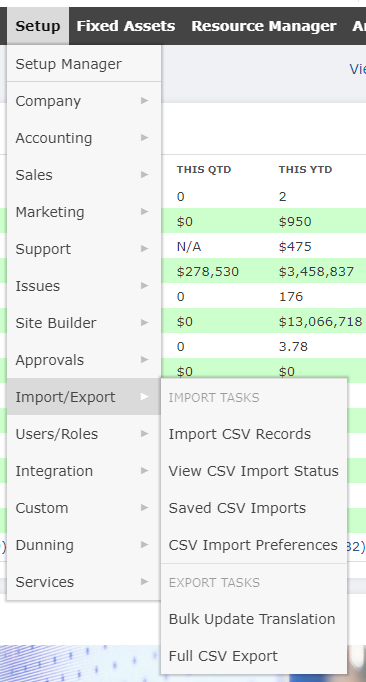
If we prepared our upload file well, the process is simple in NetSuite. There’s nothing more satisfying than a data import that works on the first try (something that rarely happens). To do any data import (with the exception of inventory adjustments) you must go to Setup > Import/Export > Import CSV Records. The NetSuite Import Assistant has five phases.
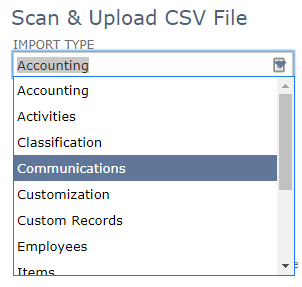
A. Scan & Upload CSV file:
The NetSuite Import Assistant categorizes data depending on the nature of it (is it transaction-related or is it contact information?). You must select the import type as the first step. There are plenty of options that help to identify the record type that you’re trying to import.
Import type:
Next, you need to specify the record that you’re trying to import e.g. employees. If you have custom records, whatever their nature is, they can also be managed by the Import Assistant.
Pro Tip: Choose the character encoding format. If you typically use special characters (like international ñ), an International or Macintosh version of Microsoft Excel, you should use UTF-8 format. If you use Windows 10, you must use the Western (Windows 1252) format.
Next, select the symbol to be used as a column separator in the CSV files you import. The most common separator is the comma.
Now it’s time to select your file. As mentioned, it has to be a CSV file, otherwise, the system will reject your selection or the file will not be available to be selected. Data Migration is a strict game, but if you follow all the steps above it can be super smooth, (try not to be frustrated if you find issues along the way).
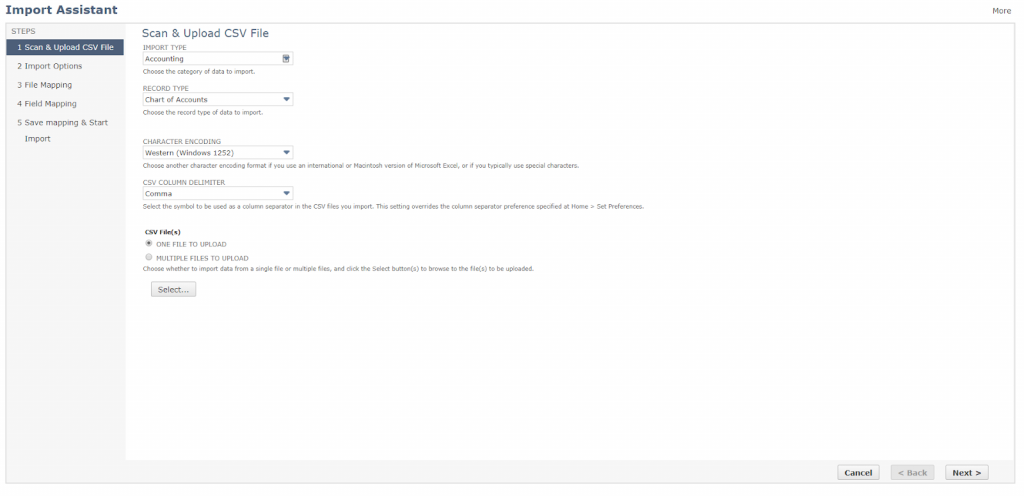
Data import assistant: Scan & Upload CSV file
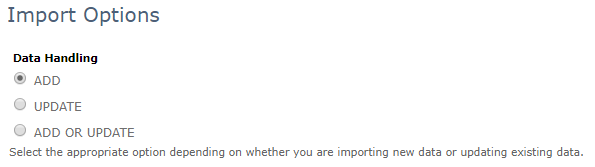
B. Import options:
In the most basic form, after press “next”, The system will deploy three options that will define how the data will be written in the system:
- Add: Your file contains all new data, and none of the records exist in Netsuite.
- Update: Your data exists already in NetSuite, you’re just fixing or updating a new field on the record.
- Add or Update: Your data file is mixed, you just want to do both processes in one step. Bold move.
It’s recommended to organize when you’re uploading files. Try to separate your CSV files by type, and nature depending if they need to be added or updated.
Import Options: Data Handling
Once you decide on one of these options, there’s no turning back. The Import Assistant doesn’t have a regret option to clean up the work. Once complete, the data is written permanently, you cannot delete or dissolve it using the import features.
The only way is to delete it manually. Be careful about your decision and file selections when you’re importing them into NetSuite.
C. Field mapping:
After clicking “next” on this part, data mapping is the following step. We have to do is associate what’s in the file with the fields that interact with the record.
Pro Tip: Your columns will do an automatic match if you use exactly the same name on the CSV file columns and the NetSuite fields.
Import Assistant: Field Mapping
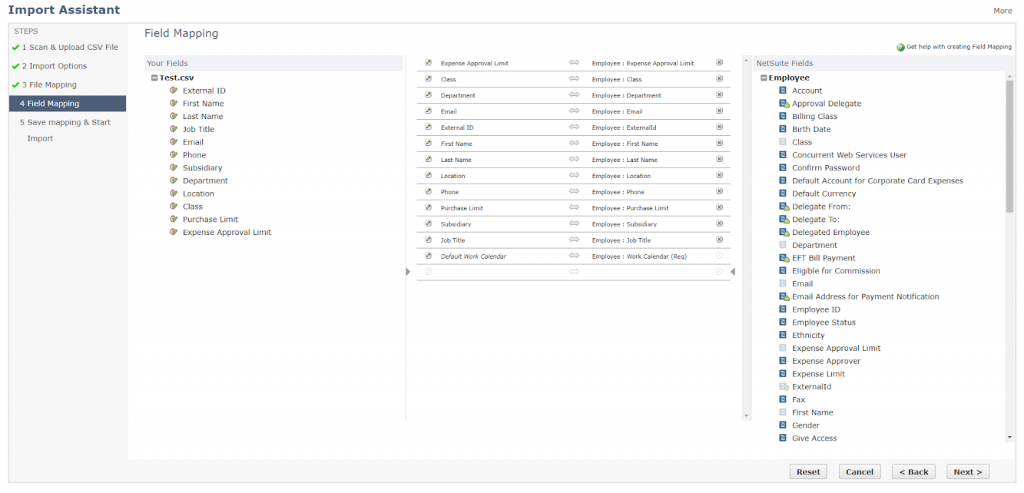
The NetSuite data model diagram is prepared to match any available field from NetSuite with your CSV file. You can also define static values in some specific cases, e.g. all your employees are from the USA, so the “Country” field can be set as “USA” for all the records.
Pro Tip: if you’re using integrations, the data mapping provides the option to create External IDs to identify the data and keep it connected with your external sources.
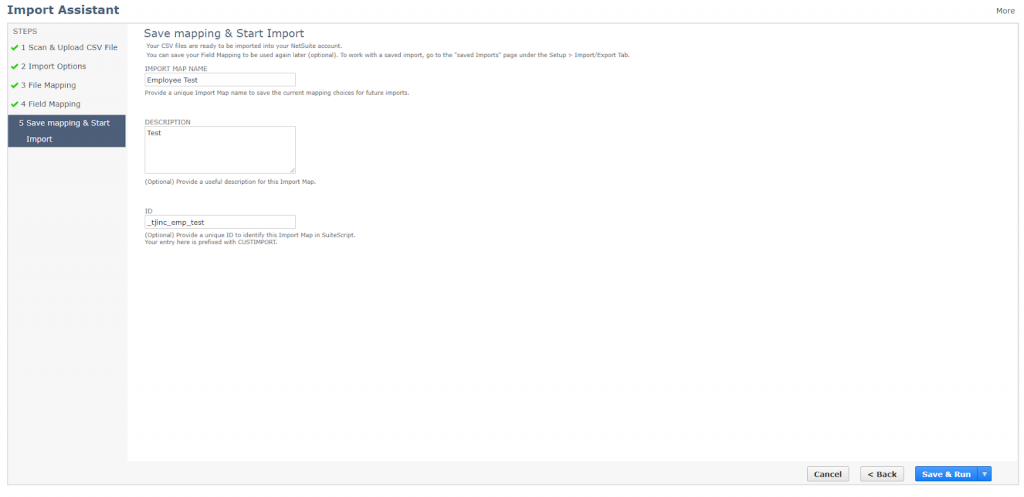
D. Save Mapping and Start import:
The fifth stage is to give a name to your import. If you’re constantly importing data to your system using CSV records, this is a great feature to save time using a template with a strong configuration already done. Press “Save & Run” to start the data import.
Import Assistant: Save mapping and Start import
You’ll receive a confirmation message that validates you did this well.
Import Assistant: Confirmation

You can always review the import progress on the Job Status Page. Once complete, your records will be available in NetSuite. This final stage takes time depending on the number of records being imported.
All your import work will be reflected in the status bar. If something goes wrong, the system provides a CSV error log.
Example of CSV error

Your data journey ends here.
My philosophy is to always simplify business processes to their core functional purpose. Think about connecting the dots and creating insights to empower your company’s potential.
Forbes says that 2.5 quintillion bytes of data are created every day and only 0.5% of data generated is analyzed! Make sure your data is worth the effort / has a purpose behind it. The benefits of having a meaningful data structure can create a huge difference in your company.
Swing by our reader’s favourite posts:
- How much should you be earning as a NetSuite Admin?: Anderson Frank survey teaches us the value of a NetSuite Admin for companies, highlighting the best opportunities to grow your career.
- The complete guide to NetSuite Implementation: Trajectory’s consultants met together to discept the NetSuite implementation process and explained in detail the considerations you must have to deliver a successful project.
- Optimize your ERP with these 8 must-have Suite Apps: looking for the best integrations to empower your ERP? Take a look at our suggested NetSuite third-party apps for happier teams & smooth operations.