“The cost of control obviously should not exceed the cost of inaccuracies.”
Thomas Wallace & Michael Kremzar
Remember our conversation about The life after your ERP implementation? Let’s continue on how to rock NetSuite as an Admin. I’ll guide you through Saved Searches and give you the top tips Trajectory Inc consultants use to maintain client environments.
Getting used to new financial systems always takes time, it’s just a matter of finding the right best practices, repeatable processes, and the right support team. If you’re an ERP software admin and Trajectory did the implementation, chances are, your team knows exactly what to do let’s get cracking:
- Time to read: 6 min
- Drink pairing: Redbull
- You are: an ERP software administrator
- In case you needed help…yesterday: give us a shout in the form below or via the chat box in the bottom right corner.
Critical searches we’ll cover (what the admin position is responsible to monitor)
- Newly created items
- Newly created employees
- Unapproved transactions
- System changes
- Missing external IDs
A starter note – have clear naming conventions
Being a NetSuite administrator means that part of our job is to organize and control each part of the business process. We are constantly under pressure to keep the system operational and any missing data represents hours of stress and headache.
Luckily, NetSuite has different kinds of Saved Searches that will help you find -almost – any data you need. But the only way to stay organized is to ensure you have clean naming conventions and saved searches for frequently asked info. If your company does not have an internal coding/name for items then the probability to lose dedicated information increases.
My principal advice to anyone is to properly name everything in the database and make it a common business rule to follow. If you follow a logical structure for documents and data, even when you don’t remember the exact name of it, you will be able to apply filters correctly to find what you need. I’m going to show you a couple of tricks for NetSuite Administrator Saved Searches that will make your working life ten times easier.
1. Newly Created Item
This search will send you an automatic scheduled email whenever a new item is created in the system. Why is this important? Your item catalogue in NetSuite should be in top shape. Item records drive many things such as pricing, GL segmentation, income, and deferred accounts, and revenue recognition rules.
So, whenever a new item is added, you need to know about it ASAP to ensure whoever created it knows what they’re potentially impacting.
Pro tip: you can also create a saved search that sends you an email whenever an item is changed. This is helpful if you’re sensitive to the item configuration such as price and revenue accounts.
Steps to create (screenshots below):
- Go to List > Search > Saved Searches > New
- Enter a title for your new search
- Set the criteria under the Criteria tab to filter items that have been newly created
- Select on Filters: System notes. This will show a pop-up window.
- On the popped-up window, select “Type” and then “Create”.
- Set another filter under the Criteria tab to set the date creation of the Item record.
- Select on Filters: System Notes, then select “Date” > Within > Today instead of All and click “Set”.
- On the Results tab, select every column that you would like to see on the final report e.g. Item name
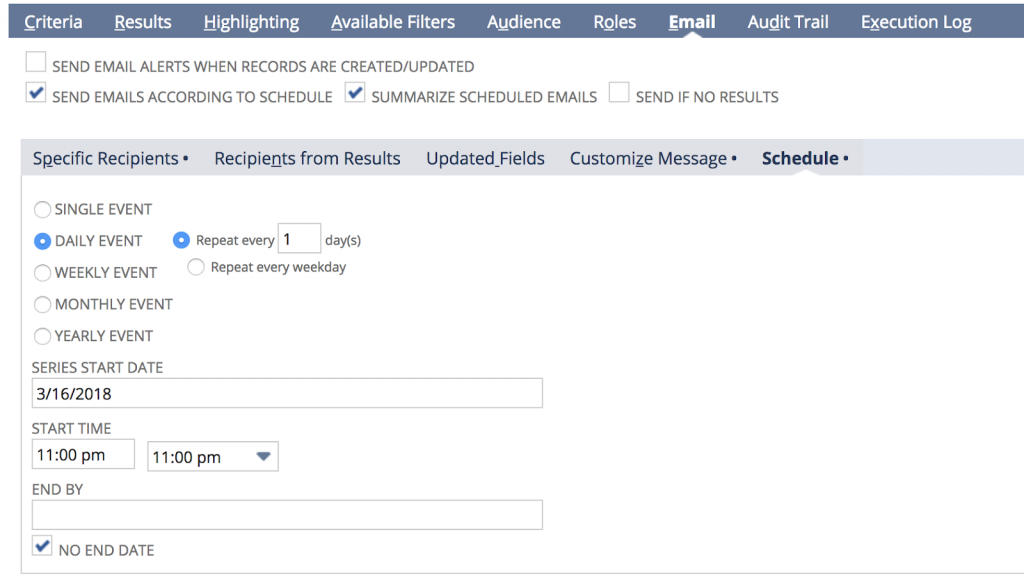
- To set up automatic scheduled emails, access the email tab of the saved search
-
- Select “SEND EMAILS ACCORDING TO SCHEDULE”
- Check “SUMMARIZE SCHEDULED EMAILS” – This makes sure email recipients receive one email each with a summary of results.
- Prepare a custom message on “Customize Message” subtab to provide rich information to the recipients of this email notification. There you can add a “From” email, subject, introduction, and the message that you would like to add. Also, you can insert NetSuite item-related fields into the message.
- Click on the Schedule subtab and select Daily Event > Repeat every “1” day(s). This is giving the system instruction to send the email every day.
- Under Start date, you can input the start date for the emails as well on Start Time function.
- Check “No End Date”
-
- Click Save & Run.
Example: this is an item type saved search

Note: You can always perform a ‘save and email’ action on the saved search to test the email functionality.
2. Newly Created Employee
You need to know anytime a new employee is added to the ERP system. You need to know if they’re given correct access, or if their banking information for ACH payments is correct.
The big thing here is access. You really want to make sure people are using the system as intended, and most importantly users aren’t given roles that could allow them to perform activities that breach internal controls (i.e. approvals for timesheets, invoices, sales orders, etc).
Pro tip: you should also manage terminated employees to watch over secure access. For advanced searches, you can create:
- Changes to employee record saved search
- No logins within the last 30 days saved search to see who’s not using NetSuite. You can then free up that license and lend it elsewhere.
Steps to create (screenshots below):
- Go to List > Search > Saved Searches > New
- Select Employee type for your new Save Search.
- Enter the Title of your new search
- Set the criteria under the Criteria tab to filter employees that have been newly created
- Select System notes. This will generate a pop-up window.
- Select on Filters: System notes. This will show a pop-up window.
- On the popped-up window, select “Type” and then “Create”.
- Set another filter under the Criteria tab to set the date creation of the Employee record.
- Select on Filters: System Notes, then select “Date” > Within > Today instead of All and click “Set”.
- On the Results tab, select every column that you would like to see on the final report e.g. Item name
- To set up automatic scheduled emails, access the email tab of the saved search
- Select “SEND EMAILS ACCORDING TO SCHEDULE”
- Check “SUMMARIZE SCHEDULED EMAILS” – This makes sure email recipients receive one email each with a summary of results.
- Prepare a custom message on “Customize Message” subtab to provide rich information to the recipients of this email notification.
- There you can add a “From” email, subject, introduction, and the message that you would like to add. Also, you can insert NetSuite employee-related fields to the message.
- Click on the Schedule subtab and select Weekly Event and select a day.
- This is giving the system instruction to send the email every week with the new records.
- Under the Start date, you can input the start date for the emails as well on Start Time function.
- Check “No End Date”
- Click Save & Run.
Example: This is an employee type saved search.


3. Unapproved Transactions
At month-end, you’ll need to ensure finance hasn’t missed transactions such as JEs or Invoices. And if they have then you need to explore why. Most of the time it’s a training issue, this saved search can help overcome the new system growing pains early on by assisting users with processes such as approvals.
Steps to create (Screenshots Below):
- Steps to create (Screenshots Below):
- Go to List > Search > Saved Searches > New
- Select Transaction type for your new Save Search.
- Enter Title of your new search
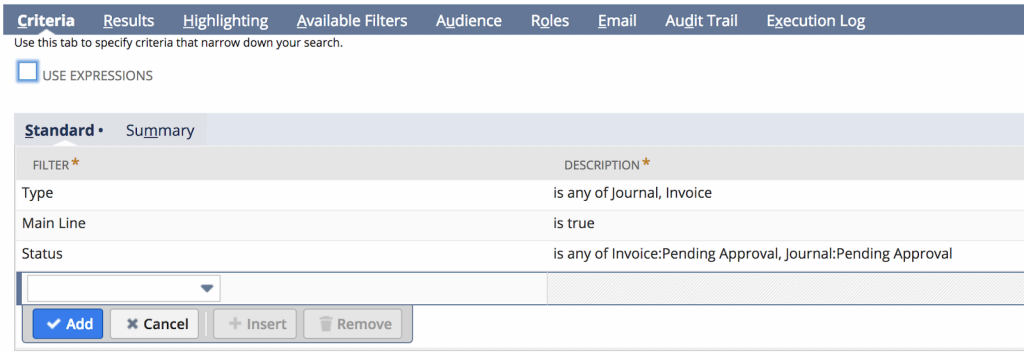
- Set the criteria under the Criteria tab to filter unapproved transactions
- Select “Type”. This will generate a pop-up window.
- Under “Type” Filter, select “Any of”, hold command or Atl key to select multiple and select “Journal” and “Invoice” then click “Set”. Set another filter on the criteria tab to filter Transactions that have been newly created.
- Select “Status”. This will generate a pop-up window (if the pop window doesn’t automatically appear, Click “Add”)
- Under “Status” filter, select > “any of”. In the text box enter > Invoice and Select > “Invoice: Pending Approval.”
- In the text box enter > Journal and Select > “Journal: Pending Approval”
- Click > Set
- To maintain order on your results you must create a filter that displays transactions in order.
-
- Set another filter on the Criteria tab, Select “Main Line”. This will generate a pop-up window.
- Under “Main Line” Filter, select > “Yes” > Click “Set”
-
- Click > Save & Run or Save & Email
Pro Tip:
- To shorten your search, add the date if it is known.
- Searches like this should be cc’d to the next approver on the transaction record as well, just so everyone’s in the loop as to the next steps.
4. System Changes Search
This is a cool one, used anytime someone makes a system change to a non-transactional record, you can be notified of it via a saved search. What this means is that anytime someone makes a change to an item record or chart of accounts, you can have a saved search capture the changes.
Steps to create (Screenshots Below):
- Go to List > Search > Saved Searches > New
- Select System Note type for your new Save Search.
- Enter Title of your new search
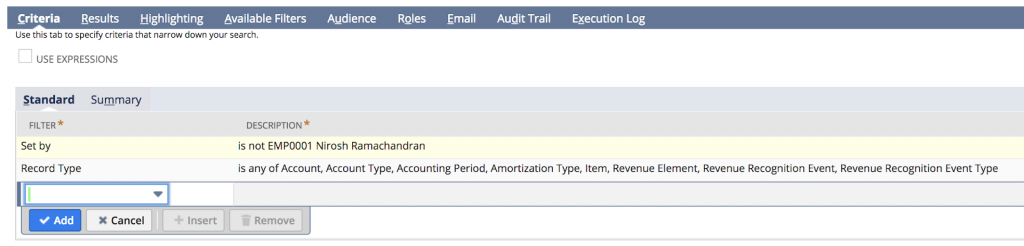
- Set the criteria under the Criteria tab to filter system changes on non-transactional records
- Select “Set by”. This will generate a pop-up window.
- Under “Set by” filter, select “any of”. On the big square, enter the employees that you would like to review and click “Set”.
- Create a new filter on the criteria tab to filter system notes that have been newly created
- Select “Record Type”. This will generate a pop-up window.
- Under “Record Type” filter, select > “any of”, and then select: Account, Account Type, Accounting Period, Amortization Type, Item, Revenue Element, Revenue Recognition Event, and Revenue Recognition Event Type.
- Click > “Set”
- Click > Save & Run
Pro tip: this search is very handy for an ERP implementation when your end users are still getting the hang of the system (you’ll usually find people accidentally making changes to records).
5. Missing External IDs
When it comes to CSV imports, we usually recommend importing the external ID of the item or the COA for example. What happens when someone creates a new item or account? Nine times out of ten, they’ll forget to update the external ID because that requires an import update.
Pro Tip: a saved search can be created to help you identify which entity records are missing external IDs. This is can be a proactive measure to prevent import errors.
Steps to create (Screenshots Below):
- Go to List > Search > Saved Searches > New
- Select System Item type for your new Save Search.
- Enter Title of your new search
- Set the criteria to filter items, first select “Inactive”. This will generate a pop-up window.
- Under “Inactive” filter, select “NO” and then click on “Set”.
- Set another filter on the criteria tab to filter items
- Select “External ID” This will generate a pop-up window.
- Under “External ID filter, select ”Any of” this will generate a pop-up window.
- Select “None” following this, click on “Done” and then “Set”.
- Click “Save & Run”

Let’s Wrap Up – NetSuite System Administration & Support
Being a NetSuite administrator is definitely the most challenging user role in the platform. The constant exchange of information and user activity makes it hard to keep data integrity – that’s why our recommendations are:
Have periodic internal audits every three to six months, depending on how many NetSuite users are active, and the overall complexity of your environment…
Period audits will prevent the system from overload, and it’s an excellent practice to keep the data clean and updated. Take into consideration that data will only be damaged by the users, so part of our job is also to generate best practices for data entry and sharing.
Create self-explanatory user guides and support information, this way your team will be trained from the get-go to use the system correctly, saving you time from mistake cleanup.
BONUS – Know the difference between NetSuite Reports vs Saved Searches and when to use which.